Since I didn’t have a theme for Monkey’s birthday, I had no luck finding a suitable birthday hat for him. All the hats I found were either ridiculously expensive (or maybe I’m just cheap) or didn’t work with what I was going for. My solution? I made one.
Now, I wouldn’t sell this to anyone. It’s not that good, but I don’t think it turned out so bad either. I didn’t think to take pictures as I went…actually…I take that back. I did. I just didn’t want to! Bahaha. I got my inspiration from this blog, although the more I look at it, the more I realize I didn’t follow her directions well.
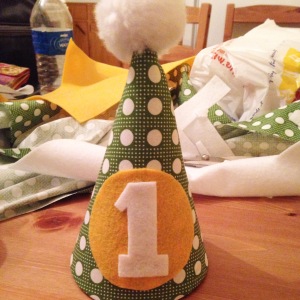
Don’t mind the messy table…I work in chaos.
First off, I didn’t read the directions very well or at all, if I’m being honest. I saw the card board and knowing I didn’t have a pattern to go by (which you can easily print if you google it and have a printer) I just went for it. I ended up using the cardboard for the hat, which she just uses as a pattern. Oops! Oh well. My hat is sturdier. 🙂
After I figured out the shape, which took about 45 minutes, I laid the cardboard onto the fabric and cut out the shape I needed with about a 1/4 inch extra around the edges.
Once you have the fabric cut, go ahead and hot glue the cardboard together to form the hat. Make sure the glue is nice and hot. Don’t use it as soon as glue starts to come out because it will cool too fast and not lay as flat as you’d like.
This shouldn’t take very long and then you can glue the fabric onto it. Make sure you match up the seams so the “ugly” parts of the hat are all on one side. Take your time putting the fabric on, making sure that the fabric is laying flat and there is fabric hanging over the bottom so that it can be folded into the bottom of the hat.
You can now proceed to hot glue the extra fabric into the bottom of the hat. Start with the front of the hat and work your way to the back. This way if there is an issue with the fabric, such as if it stretches or if there’s too much, it won’t be as noticeable.
Now for the felt. I used a soup can to make the circle and traced around it with a pen. Make sure you use whatever is proportionate to your hat though. You don’t want a soup can size circle if your hat is going to be bigger. I also freehanded the one, again, with a pen, and cut it out. You will want sharp scissors the felt too. It’s much easier and the cuts are cleaner and more presentable.
Once these are cut out, you just glue them onto the front of the hat, making sure the seam is in the back.
And don’t forget the pom pom on top! You can either make one like this or just buy some.
Measure the birthday boy/girl’s head to make sure the elastic you glue on will be tight/loose enough and then you’re done!
Easy peasy!
